
I have had a couple people ask me how to make the Birthday Banner, so I wanted to put together a tutorial on how I make these! The first step is to gather your fabrics. I have always made mine scrappy by pulling scraps and cutting off pieces of fabric from what I already have in my stash with an idea of the color scheme I would like to achieve in my mind. Another way to have a variety of fabrics that go together would be to use a Moda Layer Cake to cut the pennants out of.
Supplies:
-fabric for the background of the pennants
-fabric for the letters (I used a white polka dot on white for the latest banner, but I have also used small black polka dots on white as well.)
-2" strips of fabric to make bias tape
-Heat N' Bond
-thread
-stabilizer-I used Sulky Totally Stable, Iron-On Tear Away Stabilizer
-Word "Happy Birthday" template
-Pennant Template
Steps:
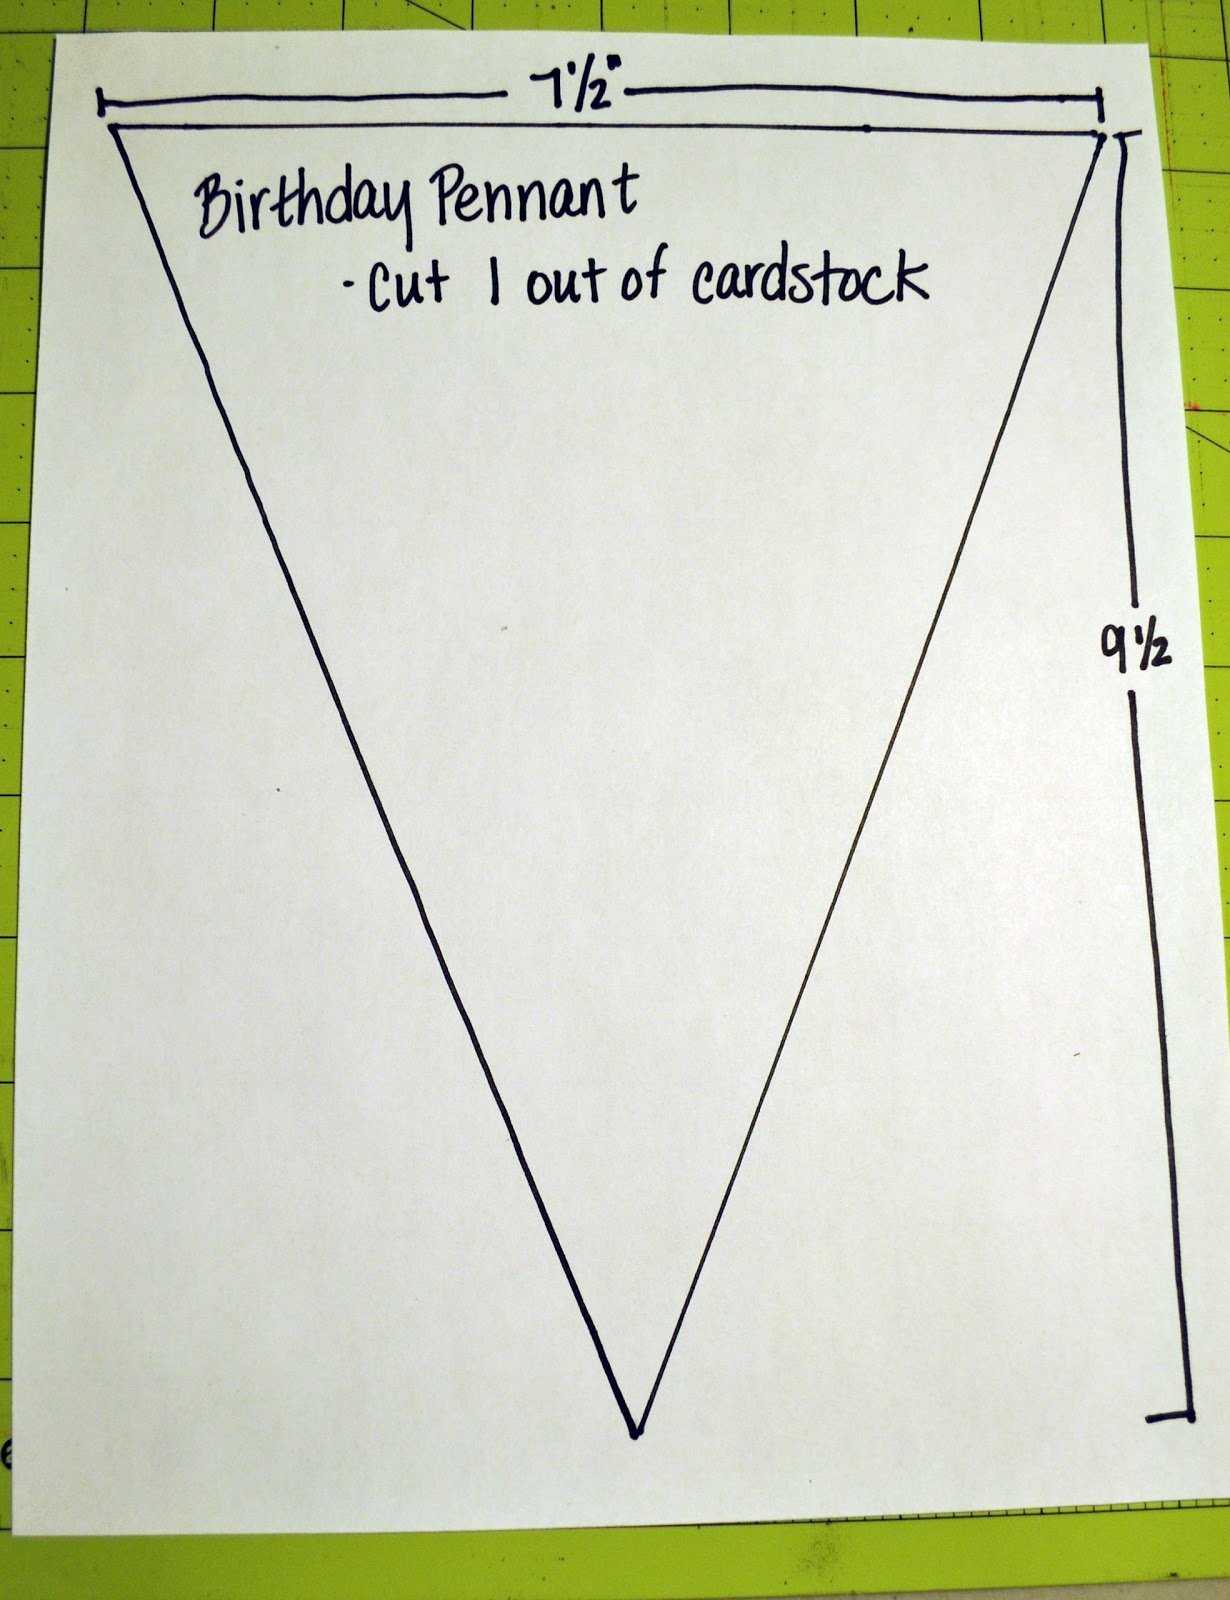
1. Cut out the pennant shape(s) from a piece of cardstock for your template. I made the top of the pennant 7 1/2 inches across and it is 9 1/2" tall.
If you were making a pennant for the phrase, "Happy Birthday Anna", you would need 46 pennants total.
Formula: Add up the number of letters you need. Add a pennant for before and after each word. Then multiply that number by two since they are double sided for the total of pennants you need to make.
I traced my design onto a piece of cardstock to use as template to cut each pennant out from. I laid the template onto my fabric and slowly cut around it for each pennant. Be careful not to cut the template because you don't want your pennants to slowly decrease in size because you are shaving off a sliver with each pennant.

3. Now it is time to make the letter appliques. I made a word document you can download here as a Google Doc. Once it is open in your browser, if you select file--download--it will download as a Microsoft Word document, so you will be able to make changes to it as you would like to do. This way you can add your name or you child's name to the end in the same font.
You could also create your own Word document with the phrase as well. Here is what I used if you would like the same font as what is pictured here.
Font: Verdana
Size: 300
The whole phrase is also "bolded" and uppercase.
4. I printed the word document off the computer and then taped it backwards to my window, which acts as a lightbox. You want it to be backwards when you trace it on the Heat N' Bond, so it will turn out facing the right way on your fabric. I did this wrong several times, so you can learn from my mistakes!

I traced the letters on Heat N' Bond Lite, which I purchased at Joanne's Fabrics with the fusible webbing on the roll. I think it is around $2 a yard. A yard is more than enough for this project!

(I don't know why Blogger won't flip this picture, but this is what the packaging looks like.)
5. Once all of your letters are traced, it is time to fuse the bond paper onto your letter fabric. I cut out sections of my traced letters on the paper and placed it glue side down on the back side of my fabric. You don't want to cut out each letter from the paper to fuse it because you will be making it much harder for yourself; I know this from experience! Follow the direction on the Heat N' Bond packaging for fusing it to your letter fabric. This letter should be facing the wrong way; this is one I traced incorrectly so when I went to fuse the letter on my pennant it was backwards.


7. Now it is time to grab the pennants you previously cut out. We are going to iron the letters onto each pennant. It helps to lay out all of your pennants on the floor and lay your letters out on them so you can see if you like the layout of your fabric.

Once you have decided which background fabric will match with each letter, carefully stack them up to take them to your ironing board.

8. The next step is to attach stabilizer to the back of each letter. I found that without stabilizer the background fabric will wrinkle up when you are stitching around the letters. I tried iron iron lightweight interfacing first, but this did not add enough support. I had the best success with Sulky Totally Stable Iron-On, Tear Away Stabilizer.

I cut several four inch strips from the stabilizer and then cut the strips into 4" squares. I went ahead and cut out all of my squares at once because it will be much easier to iron them on assembly line style.


Iron a piece of stabilizer to the back of every pennant that has a letter. This picture is from the first time I made a banner and the pennant was a little bigger, so the interfacing looks smaller in this picture than it will look in real life.
9. The next step is stitch around all the letters to make them more permanent. According to the heat n' bond, you don't have to do this, but I want the extra security of making sure my letters don't come off. Plus, the stitching helps to make the letters pop out from the background.

To make the stitches pop, I used a bright pink thread for my stitching. My sewing machine has a computer display, and I selected the standard zig-zag stitch. I set the width to 4.0 and the length to 0.30. It will resemble a satin stitch. I am not an expert at this, so you should play around to find what works for you on a scratch piece of fabric before you start on your good fabric pennants. I just started at a corner and slowly stitched around until I got back to where I started. You want to be careful going around corners, leaving your needle down while you raise the foot to pivot so there is thread all the way around the letter without any noticeable gaps. When going around curves, just go slowly and watch carefully. I do not profess to being great at this, but I am happy with how they turned out; therefore, you can do this too!

10. Once you have all of your letters fused and stitched down, you will need to remove the paper backing from the stabilizer. If you gently pull, it should come off neatly and easily.

11. Sew the front and back of the pennant together. Place your fabric right sides together and stitch 1/4" from the edge from the top corner down to the point and then back up the other side.
I used navy thread in the picture above so you could see my stitch marks. Assemble all of your pennants in this manner.


I use this little silver tool for pushing out the point at the bottom of the pennant. It has a ball on the end, so you don't push a hole in your fabric. I picked this up at Joannes, but I don't remember the name of it. I found it in the notions aisle next to the needles and pins. I have also used chopsticks and the eraser end of a pencil to do this before.
13. Now it is time to make the binding! You will need to cut 2" strips of fabric for the binding. I sew it all together using this tutorial from Amy's Creative Side. She has that you cut 2 1/2 inch strips, but for this usage, I cut 2" strips. I sew them together using the same technique she has there. I don't cut mine on the bias for this application since it does not need to go around curves. Cut 2 inch strips from selvedge to selvedge.

Once you have one really long strip, it is easy to using a bias tape maker to turn your strip into bias tape. Feed your strip into the bias maker, and slowly pull it out while ironing it down. The fabric should fold down towards the middle as you pull it through the tool. You can do this without a tool by ironing your strip in half length wise and then ironing down the sides to the middle, but the tool makes it so much easier and is fairly inexpensive. I have an old one by clover that is 1"/25 mm. It will make an inch wide strip of single fold bias tape.

I am assuming that you will want your banners to be separate words like I did with a banner for "Happy", a banner for "Birthday" and a banner for the name.
I cut my binding to the following lengths:
"Happy" (7 pennants)-109"
"Birthday"(10 pennants)-130"
"Lucy" and "Anna" (6 pennants)- 102"
"Maggie" (8 pennants)-116"
14. You will then need to fold your fabric in half towards the center and iron down.

15. The next step is to sew the bias tape together. Fold the ends down 1/4 and then in towards the center to encase your raw ends.

16. Then carefully sew the short end down and start sewing up the side of the bias tape.

I start my pennants 30" into the bias tape so I have plenty of fabric to tie around a pole or a nail to hang up my banner from. Make this a length that will best work for you!

Hang your banner up and enjoy it!
1 comment:
Thank you so much for posting this wonderful tutorial! I've been wanting to make Birthday banner for ages, and your tutorial was so easy to follow, and results in a beautiful product! I made mine this afternoon.
Thanks again!
Post a Comment